Removing paint from surfaces, especially those with stubborn, aged layers, can be a daunting task. However, with the right tools and techniques, it becomes manageable and efficient. One of the most effective methods is using a heat gun—a versatile tool that simplifies the paint removal process by softening and loosening paint layers. This comprehensive guide will walk you through the essentials of using a heat gun for paint removal, offering expert tips and techniques to ensure the best results.
Understanding Heat Guns and Their Applications
A heat gun operates by emitting a concentrated stream of hot air, which is directed onto the painted surface to weaken the paint's adhesion. This tool is not only used for paint removal but also serves various other purposes, such as:
- Drying Surfaces: Quickly dry wet surfaces without the risk of water damage.
- Thawing Pipes: Safely thaw frozen pipes to prevent bursting.
- Shrink Wrapping: Securely wrap products with shrink film.
- Bending Plastics: Mold and shape plastic materials with precision.
- Soldering: Efficiently solder or desolder electronic components.
- Adhesive Removal: Loosen adhesives and remove stickers effortlessly.
When selecting a heat gun for paint removal, consider its power levels and temperature settings. For most paint removal tasks, a medium to high setting is recommended. However, it's crucial to consult the manufacturer's instructions and proceed with caution to avoid burns or substrate damage. Maintaining a safe distance—typically around 4 inches—from the surface is also essential to prevent overheating.
Preparing Your Workspace
Preparation is key to a successful paint removal project. Before you begin, ensure your workspace is ready:
- Section Off the Area: Clearly mark the area you plan to work on using painter's tape or masking tape. This helps in focusing your efforts and protecting surrounding areas. Cover floors and nearby fixtures with drop cloths or tarps to catch any falling paint debris.
- Clean the Surface: A clean surface ensures the heat gun works efficiently. Start by wiping the area with a damp cloth to remove dust and dirt. For more stubborn grime, use a mild soap and water solution. This step is crucial for even heating and optimal paint removal results.
- Wear Safety Gear: Safety should always be a priority. Equip yourself with heat-resistant gloves to protect your hands, safety goggles to shield your eyes from debris, and a respirator mask to avoid inhaling harmful fumes.

Using a Heat Gun for Paint Removal
With your workspace prepared, it's time to use the heat gun effectively:
- Select the Right Temperature: Begin with a medium heat setting, around 300-400°F, and adjust as necessary. The appropriate temperature depends on the paint type and the material underneath. Avoid overheating to prevent damage or ignition of paint fumes.
- Work in Small Sections: Tackle the paint removal in small, manageable sections. This approach allows you to monitor the heat's effect and make adjustments as needed. Apply heat in a controlled, sweeping motion, keeping the nozzle a few inches away from the surface.
- Apply Heat Evenly: Once the heat gun reaches the desired temperature, hold it about two inches above the surface. Use a continuous motion to distribute heat evenly across the paint. Be cautious not to linger too long in one spot to avoid damaging the substrate.
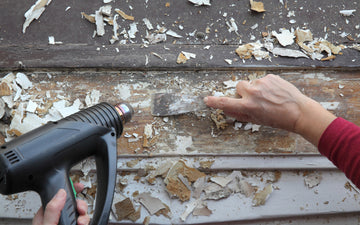
- Scrape the Paint: As the paint bubbles and softens, use a paint scraper or putty knife to gently remove it. Holding the heat gun in one hand and the scraper in the other can be effective. Ensure you have a drop cloth beneath to catch any debris.

Post-Removal Surface Care
After removing the paint, it's essential to clean and inspect the surface to prepare it for any further treatment or repainting:
- Remove Residue: Clean the surface thoroughly with a mixture of mild soap and water to eliminate any remaining dirt or residue. Rinse with clean water and dry the area completely.
- Sand the Surface: Lightly sand the area with medium-grit sandpaper to smooth out any rough edges and ensure a clean surface for new paint adhesion. Avoid excessive force to prevent damaging the underlying material. Wipe away dust with a dry cloth.
- Evaluate the Surface: Inspect for imperfections such as cracks or uneven areas. Use a putty knife to fill in any gaps with wood filler or a suitable material. Allow it to dry according to the manufacturer's instructions, then sand again for a uniform finish.
Safety Tips and Precautions
Safety is paramount when using a heat gun. Here are some tips to ensure a safe working environment:
- Avoid Overheating: Keep the heat gun moving to prevent overheating any area. Prolonged exposure can damage the surface or ignite paint fumes.
- Ensure Proper Ventilation: Work in a well-ventilated area to disperse fumes and heat. Consider wearing a respirator mask for added protection.
- Handle with Care: Wear protective clothing, tie back long hair, and keep the heat gun at a safe distance from the surface. Remove children and pets from the work area to prevent accidents.

Alternatives to Heat Guns
If a heat gun isn't suitable for your project, consider these alternatives:
- Chemical Strippers: These liquids break down paint for easy scraping. They're effective for water-based and lead-based paints but require ventilation and protective gear due to strong fumes.
- Sanding: Use sandpaper or power tools like orbital sanders for smaller projects. While time-consuming and dusty, it's effective for areas where chemical strippers aren't suitable.
Choose the method that best suits your project's needs, considering factors like surface size, paint type, and personal preference. With these expert tips, you'll efficiently and safely remove paint using a heat gun or alternative methods.


